Tuesday, April 26, 2016

Help your race photographer help you- How to take good race pics.... or at least avoid bad ones.

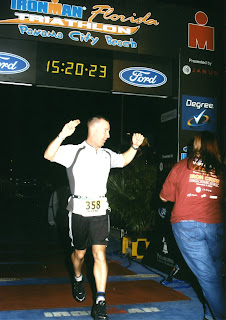
The Author, a decade and many pounds ago....

(Post disclaimer- if I am in the picture, I obviously didn't take it. If I am not in it, I did)

   I have been on both sides of the race photographer's camera. A while back, I was a practicing triathlete. This was longer ago that I like to contemplate, and one of these days I will get myself back into racing shape. Until then, I have shot a few races so far, and have noticed a few things. A lot of athletes, myself included, have no idea how to help the race photographers get great shots of us. And believe me, they want to get great shots of you racing, because you won't buy the crappy ones, and we want to make money. We like money. It helps us afford all the shiny new camera gear we crave, and other important things like food, shelter and internet access to post blogs. Looking on my old pics to open this post, I must admit to being guilty of some of the sins I will be discussing here. I do have some shots of me from racing days that I like....


 And some I could have done better.


  I had no idea that the photographer was going to be right around a blind corner, just after the feed bag station on the bike portion of IronMan Florida 2005. So, I came around said blind corner with a PB&J in hand and a mouth full of food.  You don't always know where the course photographers will be. That being said, here are some tips:

   Look for us near major landmarks on the course. If the race goes past a major landmark, or just a space with a great view or something like a park, an ocean, etc, it's a likely place for photographers to lurk.

  Look for us near key race points: If there is a turnaround, lap marker, or other significant point, it's a good spot for us. If the race splits into two courses for say, 5Kvs 10K, half vs full, etc, right before the split is a good place because we can get everyone before you separate.

  We will usually be wearing some sort of bright colored clothing, if not a reflective vest. You may notice this before the massive array of camera gear. If you see a reflective vest in the middle of the road up ahead, it's probably attached to a photographer.

   Course photographers- make it easy on your athletes..... find a spot where you will be obvious with enough warning for them to see you and prepare for the shot before you need to take it. If the race lets you, put up a sign saying "Photo Zone" or the something like that.)


    That covers the mid course, where the photographer could be lurking anywhere. Now we get to the critical time- the FINISH LINE. No matter what happened on the course, unless your race is covered by total idiots or something goes wrong, there WILL be a photographer waiting for you at the finish line. Often several of us covering from different angles. You know we will be there. So be ready. In the shot above, I knew the finish line pic was coming, I put my arms up... then got distracted by the person who finished in front of me being loaded on to a gurney by paramedics. Damn it. Things do happen, but control what you can.

    So let's talk about how to make that happen, and my personal pet peeve. Every race I have shot so far, a significant portion of the images come out like these:


 Yup. Stopping the digital device. Or sometimes ( I will withhold images for this one to protect the guilty) apparently stopping at the finish line to tweet about finishing the race. Come on. First of all, if you haven't noticed, there is a giant LCD clock running right over your head, showing your time. Second, those mats you just stepped over... yeah, they are connected to a chip that records your exact individual time so you can look it up later. So, waiting an extra five seconds to turn your stopwatch off after you go through the finish shoot really won't kill you. Maybe you can plan for this and turn it on five seconds after you cross the starting line, if it's so important to you, that way it will even out and you will get a good finish line picture.


   While the ability to leap like this at the finish probably means you didn't race all out and could have gone harder, it's the energy we like to see at the finish. However; there is one problem that will make it difficult for this superstar to find his picture. Can you see his race number? Neither could I. Which means, as epic as this leap is, it will wind up in the "miscellaneous/lost images" bin on the web site. To make sure you actually are able to find your images later on, you need to make sure that your race number is somewhere on the front of your body, easily visible and, if you can manage it, opened toward the camera and not obscured by your arms, jackets tied around your waist, etc. 

   On this same note, if your time isn't that important, try to set up your finish so you aren't in a large group of runners, or even in a small group. When that happens, we will desperately try to get shots of as many of the group as we can, but we only can do so much, and if you in the back of the group on the opposite side from the photographer, you may be out of luck. If you have done the run with a group and want to get a group finish shot, line up side by side (as much as you can without blocking other runners behind you who may care about their times) and finish together. Even better if you hold hands. And make it obvious well before the finish line. We're set up to shoot individuals, for a group we'll probably have to flip the camera orientation and open the lens up a bit, which may not be easy since we're probably on a monopod. (try hand holding a pro camera with a 70-200/2.8 zoom for a few hours straight and you won't blame us)

ASIDE: This may seem a bit stereotypical, but I have noticed a distinct difference between groups of male and female runners. There are some exceptions, but for the most part, guys are hypercompetitive assholes who will run a friendly race with someone and supporting each other for 26 miles, will usually then do their best to leave that supportive friend in the dust in the last tenth to finish first. Women who have run a friendly race supporting each other much of the course tend to stick together and finish together. 


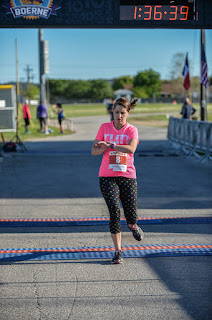
 Another tip- timing is everything. This woman wasn't quite under the finish arch yet, but was celebrating so hard I had to take the shot where she was. There was no one close to her, so I was able to get the shot and am very glad I did. But in general, we are going to take the shot right as close as possible to the moment you actually cross the finish line. If you are crossing by your self, we're gonna shoot right as you cross. If you are in a group, we'll do the best we can to get everyone as close to that moment as we can while still getting shots of everyone who isn't hidden from us behind another runner. 

  The one exception I make is for bouncing pony tails. I think the shots look better if you can see the hair flying out, so if I have the time I will shoot either early or late if I need to in order to try and get the hair. This really will only make the difference of a step or two, but it's there. 


  Give us a little emotion. You just ran hard. Even if you didn't win, you were out there. You finished. You rocked it. Enjoy it. Here's a few more people who did it right:


   Finally, you really may not care about your race images. You did it for the experience. I admire that. But I hope you will take time to find and purchase your race pics anyway. From a purely selfish point of view, I want you to buy the pics I took because the companies that hire us to shoot notice whose pics get purchased and whose don't. They take that into account when choosing which photographers to hire over and over again for races. All of us photographers like to get paid for what we do, even though we love it. But also do it for yourself. One day, a decade or so from now, you may wind up going through your old photo albums and discover: Holy crap... I really used to be in shape.... I did something awesome... I was a bad ass... hey kids, take a look at what dad /mom did when I was your age.... When I was prepping for this post, I remembered my racing days, but hadn't looked through all the old pics in quite some time. It brought back a lot of memories... and reminded me just how out of shape I have gotten, but I am sure glad I still have all those old shots, it's nice to have proof I used to be skinny. Now, if you will excuse me... I think I need to go for a run. 


Thursday, April 14, 2016

Texas Blue Bonnet Photography Revisited.... This time with Acro Yogis


   So, a couple of weeks ago I posted about my first experience attempting to shoot the famous Texas Blue Bonnets. This past weekend, I got an unplanned second attempt, and I am pretty happy with the results. It was a complete surprise shoot, so I didn't have the ladder than I mentioned would have been nice to have on my next shoot, all I had was my daily carry camera, which stays in my car just in case of days like this one. My everyday camera carry kit consists of my Fuji X-T1 with the 18-135mm lens, and the Fuji EF 42 Hotshoe flash. All the shots in this post were made using that gear combo. I also keep my Mefoto Backpacker  in the car just in case, but didn't use it for this shoot.


   Here's how it came about. A month or so ago, one of the local acro-yoga crew I have connected with here in San Antonio posted about a 5K inflatable obstacle course race that he wanted to get a team together to run. I did one several years ago with my wife (just girlfriend at the time) and some trapeze friends back in San Diego, and had a great time, so I signed up. 


   Race morning came, and as I pulled into the parking area, noticed the fields between the parking area and the race checkin/start were full of blue bonnets and some other colorful spring flowers. A few moments later I realized that I was about to spend the day with some really beautiful and photogenic people with some cool skills, so I told everyone that if we had any energy left after the race we should do an impromptu blue bonnet acro photo shoot. We did, so we did. Once I had the settings and fill flash dialed in, I even passed the camera off and got in a couple of the shots, which almost never happens. (I'm the base)


 Overall I am really happy with how these turned out. I still wish I would have had a ladder to shoot from a down angle. I know, with a bunch of acro-yogis we could have done a two high and had the top person shoot. I did think of that, but I am on the heavy side for a flier so didn't want to crush anyone, and also didn't want to burden anyone else with having to worry about the camera while they were standing on my shoulders. (although I did run a little bit of the race with someone on my shoulders, just for fun.)


    Since I couldn't go high, I decided to play with a few low angles, to get a lot of the flowers in the foreground, and try to take focus away from the race parking lot in the background, as well as the occasional other runners heading back to their cars. That was hard, because we built up a bit of an audience before we were done. 


  So, round two. How did it stack up to the lessons I learned from the first time? Well, having enthusiastic models all around was a definite help. The fill flash made a huge difference, even though it was a bright sunny day and the EF 42 didn't really have enough power to fully balance the sunlight, it did help a lot. I didn't get to test the high angle idea, but the low angles worked pretty well. Overall I am very happy with round two, and if I can pull shots like these off with just the usual gear I carry in my car, can't wait for a chance to really pull out all the stops for another try at it.

Monday, April 11, 2016

Shooting the Texas Libertarian Party Convention... couple semi famous faces in my portfolio now....


   So, answered an add in craigslist a few weeks ago, the Texas Libertarian Party was looking for photographers to cover their convention, which happened this past weekend here in San Antonio. I guess America actually has more than two parties... who knew? While spending a weekend listening to people discussing politics isn't really my idea of a good time, they offered a decent incentive package, including food and booze, so basically they had my number. I also figured it would be a good chance to get some practice at shooting more photojournalistic style stuff. As such, the images you see in this post are the straight out of camera JPEGs, which is something completely different from my usual work flow where only edited images ever see the light of day. All were imported, captioned, keyworded, culled and sorted via photomechanic and uploaded to the client (the party) as well as some news outlets in hopes of getting some shots picked up (more on this later) within an hour of the debate conclusion.

  I did a little research, and it looked like at least two people with fairly well known names would be at the convention and take part in the debate. The first, Gary Johnson, was a former Governor of New Mexico, former Ironman Triathlete and has summited Mount Everest. Pretty interesting guy.


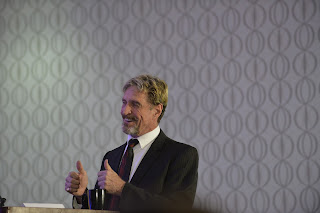
  Then there was the big name, John McAfee.


   Yeah, That McAfee. You probably have had some of his anti-virus software on your system at one point or another. Often in the news for questionable life decisions, all of which he pretty handily addressed during his remarks. Also recently in the news for commentary on the Apple vs. FBI legal scenario.


  Anyway, I took the gig figuring it would be a good time and maybe I would be able to sell a few shots to some news outlets. That didn't seem to happen. If there is a secret out there to breaking into the photojournalism arena, I haven't found it yet. Most outlets don't even seem to have a readily accessible path to submit work. If they do, it's a "public eye" sort of thing for people to post their cell phone photos of traffic accidents and the like. Put a few feelers out there, didn't get anything back. Oh well, guess I'll put them on a few stock sites as editorial use and hope for the best.


  Anyway, the Libertarians were quite a mixed bag. The main thing that impressed me was that they all seemed to get along with each other, and the debate was entirely civil, even when they disagreed with each other on points. The party as a whole seemed to fold in a great number of other groups, some of which I support, some of which I am mixed on. I didn't realize they were so big on the open carry movement. Since getting established in Texas I have obtained my carry permit, and quite frequently carry a weapon, but I prefer to carry concealed. If I am ever in a situation where I need a weapon, I want it to be a surprise to the other involved party that I have it. I chose not to take my weapon with me to the convention because it would be a pita to add to all the camera gear I would be carrying anyway and I figured there would be ample security. As a result, I think I wound up being one of the few unarmed people in the room, which isn't a feeling I like too much, mostly because I know enough about history to not trust large groups of marginalized citizenry. Note to self- get a holster insert for my camera bag.....

  On the other hand, there were families,


  And even some LGBTQ representation....


 Overall it was an interesting time. I am not sure I was convinced to vote for any of the Libertarian candidates, but I am damn sure that if I had to pick a party to party with or hang out with for a beer or three, they would totally win. (to be fair, Obama and Trudeau are tops on on the list of politicians I'd have a beer with list and they aren't libertarians) But I was definitely impressed by the respectful tone of the debate and the diverse spectrum of people who come together under the libertarian banner. It was time well spent, and even though I haven sold any of the images yet, I'll give the experience two thumbs up.


  And in an ironic coincidence, I spent a lot of the rest of this weekend dealing with a DDOS attack against my router... maybe I should have asked McAfee for assistance?

Thursday, April 7, 2016

Storage solutions that do work....

  Ok, a couple of weeks ago I pointed out my somewhat disappointing experience with my WD MyCloud Drive, and promised to talk about some storage solutions that do work, so I figure it's finally time to deliver, so here are the functional solutions I use on a daily basis,

  For speed of workflow, I do all my editing on the 1 TB internal solid state drive I added to my macbook a while back. This is way faster than the old style internal disk drive I replaced. My personal images remain on the hard drive once they are edited and done, my professional work is moved off that drive to free up storage space once it's done.

  My primary hard drive is backed up two ways. First is a bomb proof on site drive. I like having a local backup for speed and easy access, but I wanted something survivable and very durable. After a bit of searching, I wound up going with an IO Safe Solo  3GB drive. Yeah, it's a bit bigger than my main drive, but that lets me keep multiple backups on it. The IO Safe drive is basically a hard drive built inside of a fire/flood proof safe. It is large, it is heavy, and it has an all metal case that is designed to be either locked to something via a (not inlcuded) cable lock or even bolted to something in your work space. I (luckily) have not had occasion to test either the fire or the flood resistance of this drive, but as a drive it's reasonably fast and it has functioned without any hitches or errors for several years now. I think I got my first one in 2013 sometime.

   I am completely paranoid, so for my personal images I also wanted an off site backup. Pics of my kids and family are more important than anything else. Worst case, if I lose a client's shots, I have insurance for that. But insurance won't return my family's memories. (I do back the hell out of my client shots too, but I don't worry about keeping those around for decades. Once delivered to the client, I figure that mostly becomes their responsibility, although I will keep their images for as long as I can. I'll talk more about that later, I haven't had to delete any yet and shouldn't for any time soon.) On the other hand, I have some pics in my personal collection that I will enjoy but are never intended for public presentation, so I was also very concerned with security when looking at off site options. I finally settled on SpiderOak. Again, I have not had a catastrophic failure that required me to really test the service, but it's worked for small file recovery. The main advantage of the service it privacy. They make a point of warning you that if lose your password, you're pretty much screwed, they can't help you. I like that. I'm sure the NSA or a really dedicated hacker could get to my stuff eventually, but for casual purposes, as long as I am a harder target than the next guy, my data is probably safe. So Spideroak works for me. It's pretty much seamless, does everything real time in the background. The only downsides are that it is really, really slow if you need to access anything, between network access and encrypt/decrypt times it takes a while to get to any of your stored data. It's also more expensive than other data storage options. I'm willing to trade that for security since it's not my primary backup. The one other random issue with the service is that it will NEVER delete any of your data on its' own. If you delete a file off your system, SpiderOak will move it to a "deleted files" bin. So your storage on their network can get larger than what is on your HD, if you want to clear it you will have to do it manually. This can be a lifesaver, but when you have to free up the space it takes a while, because if I didn't mention it, the service is slow. But again, secure, encrypted off site storage that isn't a primary or working drive, it's worth it to me even with the price and speed issues.

  That's the personal side. Now on to professional work. As already mentioned, while an initial set of images is being worked, it resides on my internal drive, and immediately upon import is backed up onto the same IOsafe that mirrors my internal drive. Once images are complete, then things differ. The finished, edited images are uploaded to my web site, which is hosted by PhotoShelter. Photoshelter offers web site design, sales back end, and also doubles as online storage. So images I have chosen and worked up for clients are backed up as soon as I upload them to my web page. I upload the full resolution TIFF edits. As for raw files and edited images on my internal drive, once a set is finished I move the entire folder (via lightroom) onto an external drive. Since I may still need to go back and rework these images, and it is my primary storage for work images, I wanted something that was still fast, so I went with a LaCie d2 Quadra 4TB Firewire drive. It's 7200rmp, looks good sitting on my desk, and isn't really too much slower than the internal SSD when working with photoshop or LR. This is mirrored / backed up on another IOSafe Solo 4TB disaster resistant drive. I don't worry about the off site storage, because for the main part, it's covered by photoshelter, as I already mentioned.

   That's the bulk of it. I do have one final drive, a Western Digital 4TB mybook USB 3.0 drive. This one serves double duty. It is primarily my scratch drive. I don't import every image I shoot into LR for further processing. The images I do import get the full backup treatment. But, since I am completely paraoid and storage is cheap, I move the images that I don't think are keepers onto this scratch drive where they will remain, just in case, until the drive fills up and I have to start deleting the earliest files to make room for more. Because you never know. that image I hated might be one the model remembered taking and really wanted for whatever reason. Or someone could wind up famous one day. Or whatever. I know, I am just really a digital hoarder. I also use this drive as a generic working space for video I am playing with, or other stuff that isn't vital and just takes up too much space for my internal drive but I want to work with at some point.

  That's it for now. As my needs evolve I am sure I will change things and / or add to this setup, but it's what works for me for now. If I ever need to test the disaster resistance of the IoSafe Drives, I will update you on how that works, but honestly, I hope I never have to get personal experience, until then, I will just rely on reviews like this...  looks pretty reliable to me.

  So there you have it, some storage solutions that I am fairly happy with.